Showing posts with label maintenance. Show all posts

Thursday, December 8

Paranoia

Looking Down Bedford Euless Road, the Freeway is in the Distance at the Bottom of the Hill
This Morning, I Made the Trek Up in the Dark
"Just because you're paranoid, doesn't mean they're not out to get you!" Reading remarks from a lot of people, writing about their cycling, suggests that there's an overwhelming sense that motorists are somehow intent on creating danger for cyclists, either by evil intent or simply by lack of attention to the task at hand. Usually, I'm not overly prone to such paranoia, but this morning it was in HIGH GEAR. Conspiracy theories had nothing on me.

Things were uneventful on my ride into work until I crossed the 183 Airport Freeway and began the long climb up the hill of Bedford Euless Road in Bedford Texas. The photo below is looking down that hill. The Freeway I mention is in the very distance in that photo. As you can see, Bedford Euless is a pretty straightforward five lane road. It's easy for motorists to pass me. Mostly they pass me when I'm climbing the hill, because that's the direction where our speed differential is greatest. It being the morning commute, it was dark. As usual, I had my two tail lights lit, I had my rear reflector, and I was using "the flamethrower" head light on the "low" setting.

Well, about a block south of the freeway, I was passed by three or four motorists. One of them failed to realize there was a cyclist ahead that required a lane change in order to pass and had to wait two or three seconds to make her lane change. Nothing real untypical. Or was there? As it turned out, there was yet one more car behind me. I looked back again and saw a Mercedes with its left turn signal on, or so I thought. THIS car, however, did NOT pass. After a block, this began to disturb me, because I'd been planning on taking "the first left" to visit some canine friends along the way. I deferred this plan because it seemed imprudent to move over with a motorist directly behind me.

Finally, the motorist changed lanes and I did a head check. NOW, the right turn signal was on and I wondered if the motorist was planning to make a right turn from the left lane across my path. Paranoia washed over me. It didn't abate any when the motorist changed back to the right hand lane; again directly behind me. What was this guy thinking? Why would a motorist follow a cyclist UP a hill with a perfectly good second lane to use for passing? Was this a nutjob who was just waiting for an opportunity to try out that new assault rifle?

About this time, I realized the motorist didn't have turn signals on at all, but rather had four way flashers. What? Was this a case where he was planning some mayhem against my person, or was it an extreme case of a misguided attempt to "play protective parent?"

Well, eventually, I got to the top of the hill and made my left turn about a block behind where I was standing when I took the photo. To my amazement, the Mercedes continued along, in the right lane, with its four way flashers flashing. It neither speeded up nor did the driver or passenger seem the slightest bit interested in where I was going.

Lesson: Sometimes when you're paranoid, you're just being paranoid!

Sunday, May 9

Bike Shops and Shifters and Simple Green

Simple Green - Fixer of Shimano Brifters
Here, I related my first ever mechanical work that I got done at a bike shop. On my road bike. Things worked great. Or so I thought. A week ago, I went for a proper road bike shakedown cruise and it rode well  – until the first time I shifted the front derailleur from the small to the large chainring. Hmm, nothing happened. Actually, what happened was that the thing shifted smoothly and then shifted back down as I released the brifter lever. The shifter was not ratcheting. It was as if I wasn’t pushing the lever far enough to “catch.” I fiddled with the limit setting and the cable tension. No joy. Someone at work suggested I take it back to the shop. Well, looking at the receipt, it appeared that they didn’t even LOOK at the front shifting system. They did adjust the rear derailleur which was working dandy. I felt I wasn’t going to take it back because, for all I know, the car ride bunged things up, or maybe it was the long winter’s sleep.
So, what to do? Checking the internet, I quickly confirmed my previous impression (from an aborted dismantling attempt) that Shimano did NOT design the shift system for any kind of meaningful user, or even shop, intervention.

Next, I reviewed the selection of used items available on eBay. I thought it fortunate that my rear shifter works great, meaning I wouldn’t have to find an eight speed shifter. ON THE OTHER HAND, Buddy has shown me a better way – SRAM. What better time to upgrade than when I have to make a purchase anyway? It’d mean moving to a ten speed cassette, and either new derailleurs or a “problem solver.”

In the meantime, I was resigned to only using the small front chainwheel.

Fortunately, I read about the notion that something had gotten stuck, and that using WD40, applied liberally, would free things up. This vaguely intrigued me, but I also was uncomfortable with WD40 as an actual solvent. It seemed to me that things might work for a while, but then be gummed up worse than ever. Suddenly, inspiration arrived. There WAS a great solvent, and it was even one I have experimented before and received data from the manufacturer. Yes, our old friend, Simple Green.

AND IT WORKED!

Here’s how:
#1 – Protect bar tape and brifter cover from getting soaked in Simple Green (not really mandatory, but it seemed like a good idea).
#2 – Apply Simple Green to the mechanism. Easiest is to just squirt it in after you remove the allen screw.
#3 – Work lever back and forth until you can verify proper operation. Adjust the limit screws so everything works properly.
#4 – Blow the Simple Green out with compressed air.
#5 – Verify proper operation.
#6 – Add a touch of light oil.
#7 – Reinstall and ride test. I suggest a coffee run.

I guess I’ll have to wait for something else to happen before I step up to SRAM...
Steve's Bike With No Name. Both Shifters Now Work Thanks to Simple Green!

Monday, December 28

Air

In bicycle school, AIR is the first of the "ABC's" you get taught. You're supposed to check the air in your tires every time you ride. In my case, that'd mean pretty much every day. I don't follow this rule very closely, but I have adopted a routine that works well and accomplishes the desired result.

The FIRST THING is GET A FLOOR PUMP! In this regard, I agree with "BikeSnob NYC," here, in concluding that you cannot be a cyclist without a floor pump  (that post also explains part of my prejudice against triathletes). I used to use a little electric pump. No more. The floor pump is easy, quick, and portable. It sits right next to Buddy. I suggest you get one, with a gage, that'll pump to 160psi. Get that kind even if you have a cruiser you only pump up to 30psi. It'll take less strokes to get that 30 psi than a lower capacity pump. I'd ignore the dual action models unless they're not more expensive. Those are easier but you're into diminishing returns on your investment. ON THE OTHER HAND, if you read too much "Buycycling Magazine" and have gotten attracted to a carbon body pump, just send me a check instead for half the difference and I'll paint your pump black. It's a FLOOR pump, for crying out loud. I keep a second floor pump at work. It's a cheap Walmart floor pump (Bell) I originally purchased when I discovered about Armadillos and hook bead rims. It's better than nothing, and has occasionally proved handy to have around. I would not want to use it regularly. It would not last. A coworker told me the gage exploded on his.

When it comes to tire pressure, I've been influenced by Jaguar autocrossing, using high aspect ratio concours tires. In that regard, I use the maximum tire pressure provided on the tire sidewall as a starting point. In a Jaguar, you do this so you don't scrub the sidewalls right off the front left tire in the corners. On Buddy or my road bike, in the case of the more highly loaded tire (the rear on bikes), I'll often run about 5psi over that specified maximum pressure. What that means is that on my daily commuter, Buddy, with a maximum pressure of 116psi (8 Bar), I run with the front tire at 115 and the rear at 120psi. Some of you may wonder if I'm courting disaster by running with an overinflated tire. I suggest you read Sheldon Brown's page on tires and tire pressure, here. If you're a flyweight, you might want to run a little lower pressure. If you're carrying a LOT of stuff on the back, you might want to go a tad higher. If the ride is too harsh, back off on the pressure a bit.

Anyway, on my commuter, I rarely check air pressure. I've learned what the proper pressure feels like, and it's part of my Monday morning drill to pump both tires back up to the requisite pressure. It takes between three and six strokes of the pump, depending on whether I lost air when attaching the pump to the valve. If it takes more, something's wrong. Monday's easy to remember.

On Frankenbike, I follow a different routine. Frankenbike has Armadillos, and they don't take kindly to high pressure. I run Frankenbike at 80psi and use the floor pump every few weeks, or if it seems something's low, whichever comes first.

On the road, both bikes also follow a different pump strategy. Buddy and the road bike both carry lightweight pumps. When I commute with Buddy, I carry a CO2 pump (which I now know how to use) and a Topeak pump. I also carry a Presta/Schrader adaptor in my patch kit. In the case of Frankenbike, I do not carry a pump unless I'm going a long way. Frankenbike has Schrader valves and air can be obtained at almost any gas station as long (so, tell me again why "Presta is Besta?") as I have a tube and patch kit along. If I have a flat on any bike, all the stuff above about tire pressure goes out the window. I no longer care about any of that stuff, and my objective is merely to get enough air into the tire so the bike is rideable to someplace I can be pickier about such things. I'll just be extra careful over rough pavement.

Why should all this matter? I don't like fixing a flat out in the middle of nowhere, and especially not out in the middle of nowhere when it's cold and dark and maybe raining. I like to buy bike stuff as much as anybody, but I'd rather not buy things more often than necessary. I expect to get 6000 miles out of my Continentals on Buddy. I think the Armadillos on Frankenbike may survive the next ice age.

Wednesday, December 16

Wax On Wax Off

Use the "long life synthetic wax on THIS bike

Apertome DID Ask!
Bikes really ARE different. Apertome, commented here about waxing:

"I like the waxing idea, but do you think this would work well for aluminum fenders? I have Velo Orange aluminum fenders, with a matte finish. Not sure if wax would work well there.

Another thought, if I waxed my mountain bike frame, would that make it easier to clean? I assume it wouldn't harm the finish.

I've never waxed anything in my life, so I don't know much about that stuff, what do you think?"


Rather than comment, this is a topic worth a little more discussion, and hence this post. We'll address the items one by one, and then I'll blather on a little.
 
Waxing Bare Aluminum (or Chrome)
On my Jaguars, I wax most any metal or painted piece. Usually, if you wax a piece of matte aluminum, it'll remain matte, though it may shine just a little. If you don't bother buffing much, it won't shine much, so it's actually EASIER to wax a matte piece. No elbow grease! The safe thing to do is try waxing a small bit of the bottom of a fender to convince yourself that you won't object to the topside also being waxed. Why wax an aluminum fender, you ask? It's simple. The wax helps keep oxygen in the air from combining with the aluminum to form aluminum oxide. Another way to achieve the same effect would be to grease the fender, but that wouldn't look nice and would attract dirt. On my Jaguars, the only aluminumor chrome items I do NOT apply wax to are those that would be expected to get hot - as in the aluminum cam covers and cylinder head, and the chrome resonators. In any event, you want to wax the bottom of a fender more than the top because that's the part where moisture will most likely help oxygen do a number on the aluminum. Particularly important are any little corners where dirt and moisture will collect. Slop a bit of wax (or grease) on those bolts when you assemble.
 
Waxing the Frame
Waxing Apertome's mountain bike frame WOULD make it easier to clean. The dirt would wash off easier. An easy test is to wax one item, go for a really sweet and muddy ride, and then see how it cleans up compared to normal. One nice thing about wax on a bike is it isn't an all or nothing proposition, and compared to even a SMALL car, the area is minimal. As for the finish, I'll discuss that in the blather paragraph. It WILL, however, help slow paint erosion and damage to the finish from daily riding. Wax is not a miracle product, so it'll benefit the bike's finish most by reducing the effect of fine abrasives such as dust and dirt. When I wax a show car, it is an all-day operation between the wash, the glaze, and then the wax. When I wax a bike, it takes a few minutes. Most of that few minutes I get back next time I clean the bike.
 
Blathering
Now, about the finish - this is an area where I think some of the differences between bikes and cars really become important. When I put wax on my Jaguars, I always and ONLY use high carnauba wax without synthetic additives and ESPECIALLY no silicone. None of this "spray on" or "cleaner" wax. Silicone is a mixed blessing in a wax. It helps shine, but it reacts with the paint and can produce "fish eyes" when the vehicle is repainted. "Fish eye eliminator" can help, but it doesn't completely prevent the fish eyes. For my cars, I carefully avoid anything with silicone in it that will come in contact with paint. Silicone is very persistent when it reacts with the paint. Washing won't help. For a show car, I'm willing to wax more often and they don't sit out in the sun anyway.
 
When waxing a bike, I consider how likely I am to want the bike repainted someday. What that means is that I use the high quality carnauba wax on Frankenbike and the synthetic stuff on Buddy. I may want to get Frankenbike repainted. I think Buddy's frame will be worn out before its paint. This means I use all those synthetic waxes I've won over the years in concours to pamper Buddy. I wouldn't use them on any of my cars. I do use them on my wife's car, however. It's not a show car and we'll not be repainting it.
 
ONE THING to consider is getting one of those waxes that you just spray or slop on. Wipe it down and you're done. I'd seriously consider using some of that stuff on a mountain bike that got really grimy, that I didn't think I was going to get repainted. After each dirt-collecting ride, give it a good rinse to get off most of the dirt and then just slop more of that wax on. Well worth the extra 30 seconds at cleanup time and the bike will resist corrosion better. In contrast to smearing grease all over everything, it won't mess up your clothes or attract more dirt, either! Unlike a show car, you don't want this to become a major production. Most bikes never see any wax so even the most minimal effort will put you well beyond the norm. Don't believe me - go to your LBS and ask the mechanics how often they wax their bike. I will NOT be held responsible for any injuries as they roll around on the floor laughing at you. They do not sell wax at your LBS.
 
Use the "pure" carnauba wax on this bike to keep silicone away from it!

Stuff NOT to Wax
Don't wax tires or rims (you WANT grip), or plastic/rubber bits you want to appear matte. You COULD wax your chain, and some advocate doing it, but you'll have to go elsewhere to find out how. I suspect a hot melt ski wax might be the ticket, but I've never tried it and can't say how it works. In theory, however, you want a THICK lubricant for the chain that gets in everywhere and doesn't attract dirt. Sounds a lot like wax to me - penetrates everywhere when hot & melted, & then stays there. For that rubber and plastic stuff, you can dress it up with "back to black" products. I use Mother's brand for that, but that's just because I know it works and I don't know about some of the other stuff.
 
Brand Names
Stick to a reasonable priced version of stuff whose name you recognize. Two brands I like you may not have heard of are Meguiars and Autoglym. I'll use Meguiars on my Jaguars and their product line has an astounding variety. Autoglym makes my wife's car look very nice and it's what I used on Buddy's fenders. Simoniz or Turtle Wax are good products as well, but I tend to stay away from them because I have a silicone phobia and sometimes it's hard to tell. Since you're doing a bike - buy the smallest size available unless you want to pick up brownie points with your spouse by waxing the family car afterwards.

Saturday, December 5

Cycling Mythbusters - Simple Green

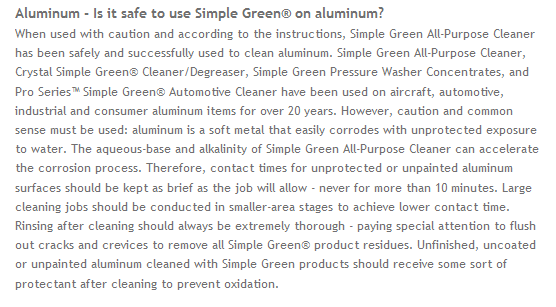
Screen shot from Simple Green website about using SG on aluminum

ORIGINAL POST on Saturday, November 28
Velo, TX suggests in his comment of November 25th that Simple Green eats aluminum. He even included a link that showed some nasty looking aircraft parts, ostensibly due to the pernicious effects of Simple Green. Well, y'all ought to know better than to put such a dare in front of Steve after he's been recovering from the flu and watching an unhealthy number of "Mythbusters" episodes. I've been using Simple Green for many years to clean both aluminum and steel components with never any ill effects on the treated parts, so this "myth" seemed suspect. No Jaguar has never collapsed into a heap of rubble due to Simple Green as far as I know. Still, Velo spoke with the voice of one who's found something out the hard way, so I determined to test this myth. I got my hands on a pair of ancient and lousy wide-reach brake calipers that came off a Schwinn. Aluminum. But before I could sacrifice these brakes in the name of science, I decided to see what Simple Green said on the subject. THAT is the picture above. Basically, Simple Green do not recommend leaving aluminum to soak in a vat of Simple Green for weeks. I would also not do what the Chinook maintainers probably did - spray the stuff on and then not get it wiped off properly afterwards. I'm also going to go out on a limb and guess they didn't use the Simple Green that conformed to Boeing Specification D6-17487P. I've never done that - not until now. Spray on and wipe off has always been the modus operandi, as with other cleaners. One would do well to remember this is a water-based product. Would you leave your chain to soak in a bucket of water for a couple of weeks? And no, I don't buy my Simple Green to the Boeing Specification. I'm not in the "money is no object" class yet, though I notice that the SG Marketing people would probably love the added profit margin.

While I was reading what Simple Green had to say, my oldest daughter came to the rescue of the brakes, so our initial test will involve ALUMINUM FOIL, immersed in Simple Green (undiluted). The test vat is below. No explosions - so far. Immersion at 4PM, CST. If this turns ugly, please don't dwell on the fact that you probably used something similar to this foil when cooking your turkey yesterday. You can take comfort in remembering that you didn't spray the bird with Simple Green before cooking. If this doesn't work in a reasonable time, we may ramp things up. Based on what I read, I would NOT suggest mixing Simple Green with sulphuric acid. Interestingly, Simple Green do not recommend mixing SG with bleach or ammonia simply because those things reduce its ability to clean. No explosions. A search in their FAQs for "danger" yields nothing.


Simple Green - How long will it take to eat this piece of aluminum foil?
Updated at 4:15 - I snuck out to the garage. So far, it looks just like the picture, except the garage is starting to smell like Simple Green. Perhaps this experiment will have to move out to the driveway if my wife wants to know what that SMELL out in the garage is from. LOVE the smell of Simple Green in the afternoon! Thank goodness I had the presence of mind not to keep the concoction in the kitchen or I might be out in the driveway...

Updated at 1PM Sunday - The Simple Green smell in the garage has leveled out, thank goodness. No visible change in the foil so I tried poking it a bit. BORING! I thought about spitting in the solution, but that seemed rude. Where do you get C-4 around North Texas and where are the approved locales for detonating it?

Updated at 8PM Monday - Still the same. The Simple Green seemed a little chillier when I dipped my finger in it, but otherwise nothing...

Updated at 8PM Saturday, December 5th - COOL, most of the Simple Green has gone away. The aluminum foil seems unaffected, it's just sorta sticky and got green film on it. Some say that when I saw this, I said "Aw shucks! This here dang experiment ain't doin' nothin'. I'm done with it now, I reckon!" I'm stomping off to bed. We'll see if THAT has an effect. If not, I'm going to squirt some water back into the container and maybe stir in a little dirt.