Showing posts with label fenders. Show all posts

Monday, February 7

Inspired by Indiana

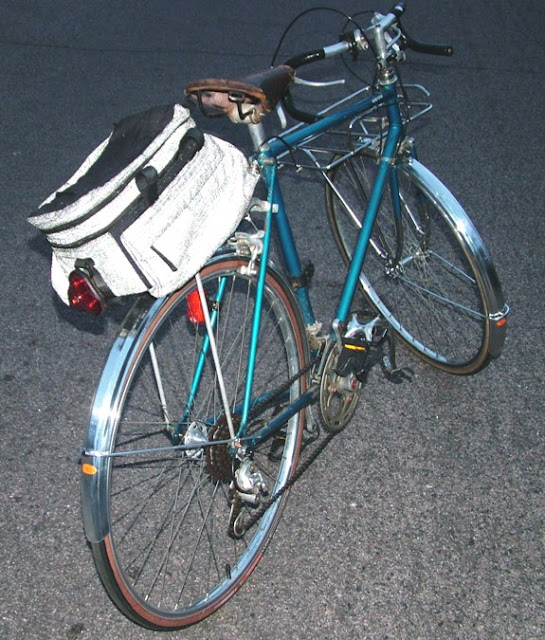
Big Oak Broke Down My Resistance and Now We've Got Fenders and a BIG Front Rack

In January, Big Oak, up in  got some Velo Orange fenders for his Tricross. That was not too long after my own Tricross rear fender broke. Unlike Big Oak, however, my Tricross has no Brake Bridge drilling in the rear so the VO fenders wouldn't work for it, and it really doesn't call out for polished aluminum components.

HOWEVER, as I considered the very low price for the VO metal fenders, it occurred to me that the fenders would go very well on one of our bikes; namely my wife's bike. What's more, when I looked further, they had their front Porteur Rack on sale at a good price as well.

Before you could hum the fight song to either Indiana University or Purdue, the fenders were here. Luckily for me, before I put them on, a cautionary note about trimming the fender stays came and I was doubly careful not to repeat the oops of my pioneering mentor.

Actually, I think the combination came out rather nice and the bike can carry more stuff now than I think I'd really prefer to carry. Heck, I'd be all set up if I were to get a paper route.

After I bought these, they had another special on top of the special which has now ended, but the basic fenders are still on sale and a real bargain. I'll have to make another hardware store run to better attach the rack, but everything mounts very solidly. I even got a set of cross levers that I'll use in combination with those "Shifty Shiftless" swap meet levers to finally retire the vintage, virtually useless "suicide levers."

After I did all this, I looked at the weather forecast. More ice is in the offing. In retrospect, perhaps I should have considered that the time spent finishing all this off might have been better utilized in getting my knobby cross tires mounted on my spare rims - just in case...

The Bike Before Its New Additions
 
Looking at the Fenders From the Rear. VO Sticker is Still On and the Rear Fender Stay is Untrimmed

Warned by Big Oak, I Got the Fender Entirely Set Up Before any Trim

A Sharp Pair of Snips and the Stay was Set. No Hacksaw was Needed for This Baby

Monday, December 27

Bikes are Like Old English Cars Only Different

There was a period when we drove English Cars, mostly Jaguars, every day. One thing about older Jaguars (and other makes as well) is that they silently communicate to each other, enticing all but one to break down and become non-mobile. You could own four or five and find that only one would run. Alfa Romeos seemed to have the same characteristic.

Old Jaguars are NOT Real Reliable! Ours Occasionally Broke Down
In that way, it seems my bikes have gotten infected as well. First, unaccountably, Frankenbike got a flat tire, just sitting around the house. That was compounded by a reluctance on its owner's part to chop down the retention band on the Minoura Besso light holder. Not real hard to fix, but it requires a decision.

Next, for unknown reasons, the road bike's rear brake cable got sticky. That's an easy item to fix, but the road bike's rear cable will work well for the front canti brake on Buddy, which I haven't installed yet.

Third, Buddy displayed a little attitude (as if bikes could do such a thing) last weekend. The night before the ramble, I tried pumping up its front tire. No joy - psss. I had to put a new tube in (this was the tire that I busted the presta stem on a while back). Everything else seemed fine, including the new rear canti brake once I added a couple of extra washers to compensate for the brake difference.

I tried patching a tube that'd picked up a largish hole previously when it failed due to a rim strip break, but that didn't work. As a result, I put in a new tube. Everything seemed fine. A little sloppy, I didn't feel like cleaning the chain the night before the ramble, so I added lubricant without cleaning. Yes, it's not a good practice but it is better than riding with a dry chain. It's an "ABC Cheat."

SKS Fender Snapped for No Apparent Reason
On the ride, the chickens figuratively came home to roost. First, for reasons not determined, the SKS rear fender snapped on the way out. I'd hoped they would last longer than nine months. Then, the rear tire went flat on the way back. As I removed the tire, Doohickie wryly observed my chain could use a little cleaning. Thanks!

ON THE OTHER HAND, bikes may break, but unlike Jaguars, they're a lot quicker and easier to fix. Heck, for the price of a tuneup, you can even get a whole NEW bike.

Buddy, With Half a Fender and No Air in the Rear Tire

Sunday, March 14

Finishing With Fenders

Front Fender Comparison.
SKS is at Left. PB are Installed

So there you have it. In the final analysis, Buddy wound up with a Planet Bike SpeedEZ Front Fender using the SKS Stays, and an SKS Rear Fender. If I were starting out from scratch, what would I do? Well, comparing them, the SKS Chromoplastic fenders are pretty similar to the Planet Bike Cascadia Fenders, except they're about $10 cheaper and lack mud guards. The stay design is different, with the PB fenders using two separate stays while the SKS use one long one with the eyelet loop integral in the middle.

Rear Fender Comparison. SKS is at Right (Installed)
As you'll note, the stay design is similar enough that you can use either fender on either stay. I prefer the SKS stays because they don't take up as much room as the PB stays, which are much like those that Bluemels used back in the 1960s. SKS DOES offset that with a "safety" plastic breakaway thingie for the front fender which none of the bolts provided actually work with. The plastic thingies are sitting on the table.

When it comes to the fenders themselves, the photos make them look more different than they do in regular light. There is a slight bead in the center of the SKS fenders that make them a touch more rigid.

If I believe Peter White, the SKS might have a bit of a durability edge. Myself, I think you could flip a coin and do equally well. Because of the stay design, I'd tend to favor the SKS fenders and add a mud flap of my own. Since I started out with the PB, I'll stick with their mud flaps and replace the fenders if and as they crack over time. I'm sure I can put a PB mud flap on an SKS fender if necessity so dictates.

OTOH, I'm still using Bluemels fenders I got back in 1972 (on Frankenbike), so maybe Peter White's claim that fenders are life limited items is not really true.

One BAD thing about abandoning the "rubber bungee" approach. Attaching the stays did cause paint chipping which will have to be dealt with in good time. Bikes had better paint in the olden days. The paint on the Motobecane will probably outlast human civilization.

Tuesday, December 15

Wax Friendly Bike Fenders

Buddy in full wet winter commuting gear, including quick on/off fenders
Around North Texas, rain is not something you deal with most days, but fenders would be nice for those days where the roads may be wet but no electrical storms are around. As I reported here, I got Planet Bike full coverage “SpeedEZ” fenders for Buddy, my Specialized Tricross commute bike. Outside reviews of the fenders may be found here or here. I’ve now reworked the fenders so they actually go on and off without any tools or knives or any consumables, unlike what Planet Bike provided. Now, it’s easy to wax the fenders – just take ‘em off! If the roads are wet, I can quickly put them on. I needed to acquire a few common items that Planet Bike does not include in the kit to make it work, including SOME made BY Planet Bike. Here’s the story, including why one might want waxed bike fenders in the first place:

AS RECEIVED PLANET BIKE FENDERS
As received, the fenders have rubber bungees, a clip, some bolts, and some zip ties. The PB instructions are shown below.
Planet Bike fender instructions. Click on image to read their
notional isntallation, along with my arrows, and shake your head...


As it turned out, the included bolt was too short for the Tricross fork and there is no drilling in the rear for a bolt. The clip had nothing to attach to, and pretty much nothing went on the way Planet Bike imagined. Their instructions required use of as many as four zip ties. I DID zip tie things on for an initial trial installation, and the zip ties scraped the paint off the rack bracket. What’s more, the front fender rattled like a Thompson Machine Gun. Still, as shown in the photo, the fenders DID look very nice when installed, other than the Planet Bike ad on the mudflaps. There were three choices, put the fenders in a dark closet, get new stays and use them as permanent mount items, or do a little engineering. Three guesses which option I chose and the first two don’t count.

FRONT FENDER
The first step was to figure out a way to mount the front fender reliably. To do this, I took the bracket that PB intended for the rear fender and used the “too short” bolt as a simple “hold it in place” pin. The bracket now just slides into the fork drilling, keeping the front fender straight and preventing rattling. The electrical tape serves to help preserve the paint in the drilling hole and further damp any movement. Now the front fender goes on quickly, securely, and easily, without any rattle. So far, no added money expended other than about 2 cents worth of electrical tape and about 15 cents for the cost of the extra bolt and nut I already had on hand.
Planet Bike didn't include this in their instructions!


Planet Bike "Bayonet" installed before fender is in place.


The only front fender part not from Planet Bike
came from Lowe's and was sitting around


This fender is NOT going to rattle!

REAR FENDER
This left the back fender without the Planet Bike clip. In the case of the back fender, PB has a better excuse for a difficult rear installation, because some Specialized models use a “Zertz” insert for the Specialized marketing people to hype. The Zertz makes installing SpeedEZ fenders difficult, because the insert interferes with where the rubber fender attachment would normally go. This gave me a choice of adjusting things for the rubber to mount above the insert or below. Mounting above the Zertz raised the fender up so high it fouled the V brake. Mounting below the Zertz allowed the fender to rub on the wheel where it passes under the brake.

The only actual purchase
I went to my LBS to order up another PB clip. The PB website lists them for $4. They were nice enough to give me the second clip for no charge. PB and the LBS both get an “attaboy” for better than expected customer relations. With the second clip, I determined to find a way to make both mounting choices work, with ride experience settling the matter permanently. Again, no zip ties or bolts allowed here. First, I got a clip off of a rack mount clip. This is a clamp that allows a rack to mount on a bike without rack braze-ons. Conveniently, mounted at the hole at the front of the fender, it clips directly and securely to the bike without need for dorky zip ties. I sprayed “Plasti-Dip” and wrapped things in electrical tape to minimize possible paint scraping. The clip cost $5 (for two of them) and I used about 50 cents worth of “Plasti-Dip.” Now I’m thinking about what I’m going to use that second clip for. I really would have preferred a plastic clip since that would avoid the possibility of bridge paint scrapes entirely, without any need for “Plasti-Dip.” I DID see a possible plastic clip in my daughter’s Volkswagen, but it seemed unwise to start stripping family cars for bike fender modifications.

Rack clip installed at the front of the rear fender
ready to clip on to the bridge
electrical tape worked better than "Plasti-Dip"


Next, I determined a means to attach the fender to the second clip for a “low mount” so it would not rub the tire. My initial thought was to use a bungee with the clip. However, upon connection, this turned out to be an inelegant solution and seemed a bit unstable. I’ve also had bungees break from time to time. As a result, I hit on using an old, leftover brake cable (I imagine a new one would also work, but THAT would have cost money) and the mount for the cantilever brake. The improved installation, which easily attaches or detaches, is shown below:
Motobecane brake clamp finds a new use
MUCH cleaner than a bungee and it is out of the way

Now I have front and rear fenders that install quickly and remove even more quickly, without needing to bolt or zip tie anything onto the bike, or cut and hack to get it off. The only needed finishing touch was to sand the silver paint of the PB logo off the mud flap so I don’t look like a rolling PB billboard.

WAX THOSE FENDERS
I almost forgot one last thing. When I was showing Jaguars, I observed entrants apply wax to all kinds of things other than the exterior paint. Relevant to this post, I discovered that a waxed windshield shed rain without using the windshield wipers, and also looked lovely to the concours judges. It was fascinating to thus drive in the rain with a completely clear windshield. Windshield wipers are only needed for dirty cars! Anyway, fenders are no different, so I waxed my PB fenders. Before you laugh, consider how mud and stuff gets stuck in your fenders – because they aren’t waxed. I will have much less problem in this regard, and cleaning them will be easier. Waxed fenders make for easier maintenance. I don’t suggest you become a fanatic and only use carnauba wax on your bike fenders, nor that you need to use show car glaze before the wax application. The “lasts forever” wax will be more than sufficient. You won’t be needed a lot. And bike judges are not going to be criticizing the wax application quality on the underneath side of your bike fenders, but they won’t get nearly so clogged with crud. It’s one more reason for “easy on/easy off” fenders – they’re easier to wax. I’ll bet you never read THAT in any of the cycling magazines! Are YOUR bike fenders properly waxed? It took me more time to walk out to the garage to get the wax than it did to apply it.

I used Autoglym "high resin polish"
I recommend whatever is sitting around


Those Planet Bike logos on the mudflaps look MUCH better
once you sand off the silver paint

Road Tests
First indications were that the fender mounting worked like a charm. I did a local run. So, I left the fenders on for my commute. There's nothing like 10 or 20 miles of sometimes rough pavement to reveal the shortcomings of fender mounting. First, and worst, the front clip on the rear fender did NOT have the strength to stay clipped. I'll have to find a replacement for the only item I actually bought. Serves me right - Rantwick might like buying bike parts, but I only like buying cool ones. Second, the front fender, over the miles inched up the fork just enough that it touches the front V brake. I think I can fine tune that one. In the meantime, I'll use a zip tie on back while I look for a better solution. There's enough tension on the clip that I may want to use something with a more positive retention. As they say, back to the drawing board...

Tuesday, November 17

Fenders Need Work

Besides the rack and bag, posted here, which unquestionably have utility for commuting, I got a little overenthusiastic and bought some fenders for Buddy. Keep in mind that it doesn't really rain all that much around North Texas to start with and I typically pick rain days to bring in clean laundry and take home the used equivalent.

Having (I hoped), at least a lick of common sense, I elected to pick fenders which would go on and off easily. After reading a bunch of reviews, I picked the "Planet Bike Speedez" fenders, which come in a black color that complement Buddy's red, white, and black color scheme quite well. These fenders had some really GREAT reviews, which gave me hope.

You can see them installed in the photo in the previous post, here. Except for the "Planet Bike Ad" on the mud flap, they look very nice indeed. Even the logo isn't anything a "Sharpie" can't fix. But they're not really set up to mount for anybody not willing to tweak things a LOT. In the photo, they were not really ready for prime time, as will be seen.


Except that fenders aren't made in England any more, some things haven't changed. Putting fenders on a bike is a fiddly task, and it gets even harder if you want the fenders to go on quick and easy for those occasional wet road situations, keeping them in the closet the rest of the time.

FIRST PROBLEM
Problem #1 was mounting the REAR fender. Planet Bike didn't account for the  Specialized Tricross marketing team that elected to put a dopey "Zertz" insert exactly where you might want to mount fenders. It gave me two choices. I first tried mounting them at the "Choice #1" location, which, when adjusted as much as possible, rammed the rear fender into the V Brake, making it pretty useless. Then, I tried mounting them at the "Choice #2" location which left the fender rubbing on the rear tire. Mounting the included clip fixed this problem, albeit at the cost of a tacky zip tie (actually, I needed to use TWO zip ties and probably ought to have used THREE). What the heck are zip ties doing in a fender designed for "rapid on/off" operation anyway? I might have better off just to do the traditional "bolt it on" fender installation, except Buddy has no "caliper brake bridge" that such fenders traditionally use. It's got a V brake, with an added fitting I could use for a cantilever brake. No caliper brake drilling.

SECOND PROBLEM
Problem #2 (I only had two problems) was to mount the FRONT fender. While this one went on fairly cleanly, there was nothing included in the mounting kit to attach it to the "brake bridge" (it's really more of a "front rack bridge") except one attractive looking black bolt that wasn't long enough to pass through the hole. I'm not sure exactly WHAT the bolt would have attached TO in any event since Planet Bike didn't include anything other than four holes in the fender. Even this wouldn't have been too bad had not the fender rattled like a machine gun. I could have fixed this with yet another zip tie or two, but at this point, I said to myself, "no mas zip ties!" I'm really NOT a fan of needing a whole bag full of zip ties to attach fenders I want to be able to attach and detach at a moment's notice. Rubber and bungees are OK. They're reusable, even if they might rot if too much UV gets to them.

I've got a bit of work to do. Tonight, the fenders came back off. There's a bit of supplemental purchasing at Lowe's or Home Depot to get things right that the marketing geniuses and what pass for engineers at Planet Bike didn't think out. When these fenders go ON the bike for real, I'll get them on in under a minute. They don't do that as received from the Planet Bike people. NOT EVEN CLOSE. NOT EVEN IN TEN TIMES THE TIME.

In their defense, at least Planet Bike TRIES to make fenders. They just don't do it real well, though their instructions do give you a choice of English or French. You can't really say that about most of the other major bike equipment suppliers. And PB, albeit not very good,  DOES have more promise than what Bluemels  and the other classic suppliers have become nowadays. Hammered aluminum or wood may LOOK nice, but Buddy is a WORKING bike. This is the 21st Century, people. We shouldn't HAVE to either run without fenders or leave them on forever any more! To twist Marx around, "Bike Riders of the World Arise, You Have Nothing to Lose But Your Fenders!"

Regardless of the design, these fenders WILL work on Buddy and I'll do a follow-up post showing how at that time...